HTTPS for MDaemon Webmail must be enabled with a valid certificate. Self-signed certificates are not recommended.
- Go to the Google API console: https://console.developers.google.com/
- Create a new project
- Click OAuth consent screen
- Select External
- Click Create
- Enter an App name, User support email address, and Developer contact address
- Click Save and Continue
- Click Add or remove scopes
- Under Manually add scopes enter https://mail.google.com/
- Click Add to Table
- Click Update
- Click Save and Continue
- Click Add users under Test users
- Enter the user(s)
In most cases, this should be the google address. - Click Add
- Click Save and Continue
- Click Back to Dashboard
- Select Credentials
- Click + Create Credentials
- Select OAuth client ID
- Select Web application for Application type.
- Enter Name
- Enter the following in the Authorized redirect URIs section:
https://mail.company.test/WorldClient.dll?View=OAuth&AuthRequest=GMail
NOTE - Change mail.company.test to the FQDN of the MDaemon server - Click Create
- Copy the Client ID and Client Secret to a secure location.
In MDaemon:
- Open the MDaemon GUI
- Select Setup
- Select Server Settings
- Select MultiPOP
- Select Enable MultiPOP
- Enter the Client ID and Client Secret under the Gmail section.
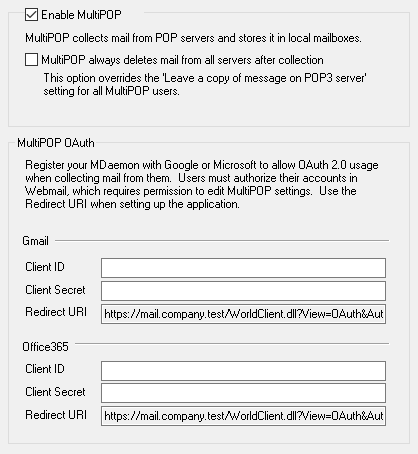
- Click OK
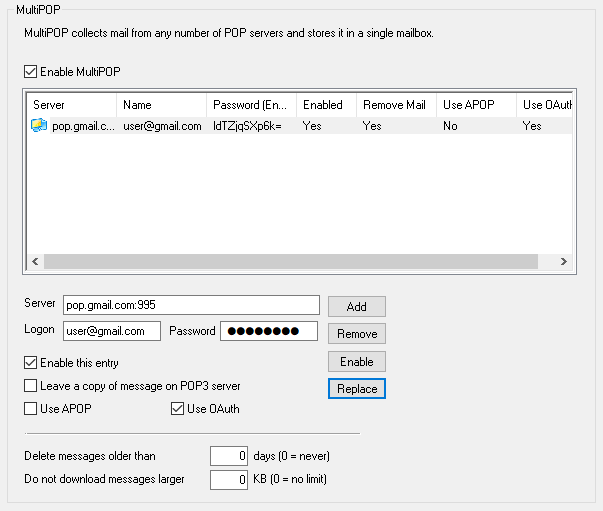
To create a new MultiPOP profile for a user:
- Open MDaemon
- Select Accounts
- Select Edit Account
- Double click on the account to open the account in the Account Editor.
- Select MultiPOP
- Select Enable MultiPOP
- Enter pop.gmail.com:995 for the Server text box.
- Enter the Gmail address in the Logon text box.
- Enter the Gmail address password in the Password text box.
- Verify Enable this entry is checked.
- Check the Leave a copy of message on POP server if desired.
- Select Use OAuth
- Choose the number of days to delete messages older than. (0 = never delete)
- Choose the maximum size of messages that MDaemon should download. (0 = no limit)
For existing MultiPOP profiles, administrators will need to enable OAuth for each MultiPOP profile.
- Open MDaemon
- Select Accounts
- Select Edit Account
- Double click on the account to open the account in the Account Editor.
- Select MultiPOP in the Account Editor menu.
- Select the MultiPOP account to modify.
- Verify pop.gmail.com:995 is entered in the Server text box.
- Click Use OAuth
- Click Replace
- Click OK
Alternatively, the MultiPOP profile can be created or edited in MDaemon's Remote Administration:
- Login to Remote Administration as a global or domain admin.
- Select Account Manager
- Double click the account to edit.
- Select MultiPOP from the Account Settings
- Double Click on the host or select the host and click Edit to edit an existing profile or click New to create a new MutliPOP profile.
- Check the Use OAuth checkbox.
- Click Save and Close
End Users must have ...edit MultiPOP settings enabled in order to authorize the account with Google.
- Open MDaemon
- Select Accounts
- Select Edit Account
- Double click on the account to edit to bring up the Account Editor.
- Select Web Services
- Verify that ...edit MultiPOP settings is enabled.
- Click Ok
Once enabled, the end user will need to perform the steps below to authorize MDaemon to connect to the Google account.
- Log in to Webmail
- Select Settings (Gear Icon)
- Select Mailboxes
- Click the Authorize button for the Google account.
- Click Connect to Gmail
- Select your Gmail account and sign in.
- Click Accept on the Permissions requested page.
- Close the popup window after successful authorization.