The setup and support of these services under IIS are not supported by MDaemon Technologies' support team. Those who choose to run any MDaemon related protocols or services under IIS must be aware of all security issues and ramifications of this configuration.
This configuration can be automatically configured using a Powershell script designed by MDaemon Technologies. Please contact MDaemon Support if you would like information on using this script.
- Install the Web Server (IIS) Role with ISAPI Extensions on your Window's operating system.
- Install Microsoft's IIS URL Rewrite component.
- Navigate to http://www.iis.net/download/URLRewrite in a web browser.
- Run the installer to install the extension.
- Open the IIS Manager
- Click Start
- Click All Programs
- Click Administrative Tools
- Click Internet Information Services (IIS) Manager
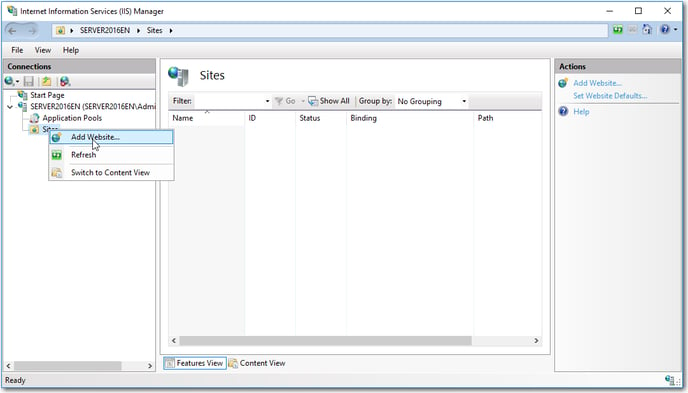
- On the Connections pane, expand the [Machine_name] node.
- Right click on Sites.
- Click Add Web Site.
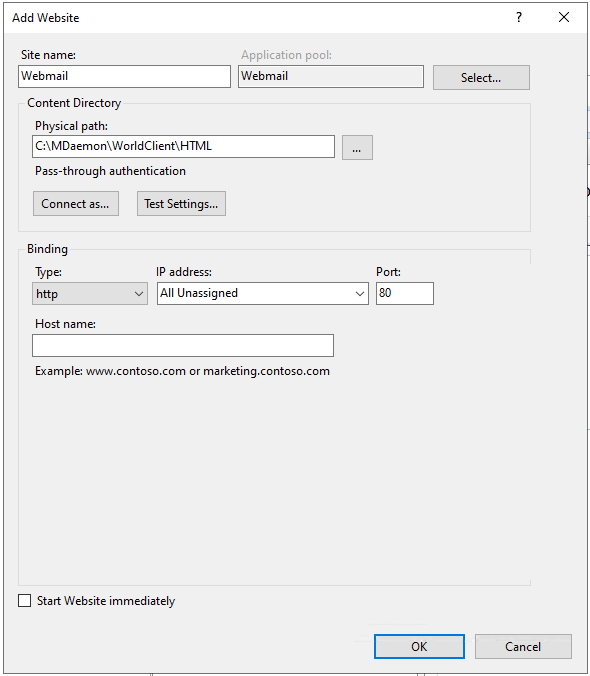
- Enter a Site name (i.e. Webmail). This will also create an Application Pool by the same name as the web site.
- Click the browse button (the button with '...') by Physical path and browse to the 'MDaemon\WorldClient\HTML' directory
- Set up the Type, IP Address, and port bindings as desired in the Binding section.
- A basic configuration will leave the IP address as All Unassigned unless a specific configuration is required.
- The Host name can be left blank unless a specific host name is required.
- Click OK
Add HTTPS and a valid certificate to the site bindings
If you do not have a valid certificate, see the article below on how to obtain a valid certificate at no cost from Let's Encrypt using MDaemon.
- Select Webmail site from the Connections page.
- In the Actions menu on the right, select Bindings... under the Edit Site section.
- Click Add...
- Select https in the Type drop down box.
- Enter 443 on the Port (or enter the desired HTTPS port).
- A basic configuration will leave the IP address as All Unassigned unless a specific configuration is required.
- The Host name can be left blank unless a specific host name is required.
- Choose an SSL certificate in the SSL Certificate drop box.
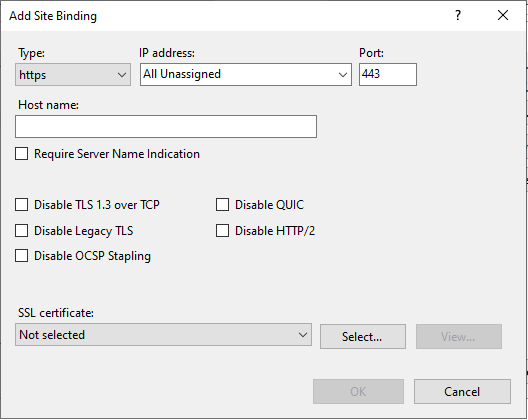
- Click OK to add the site binding.
- Click Close to close the Site Bindings.
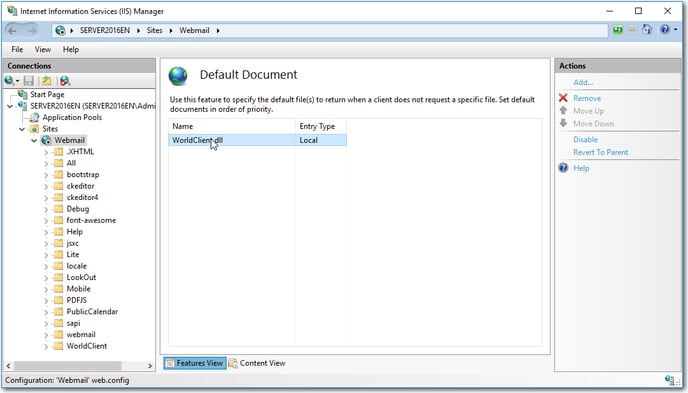
Verify the Webmail Default Document
-
- Click on the Webmail site in the Connections pane.
- Double click on Default Document
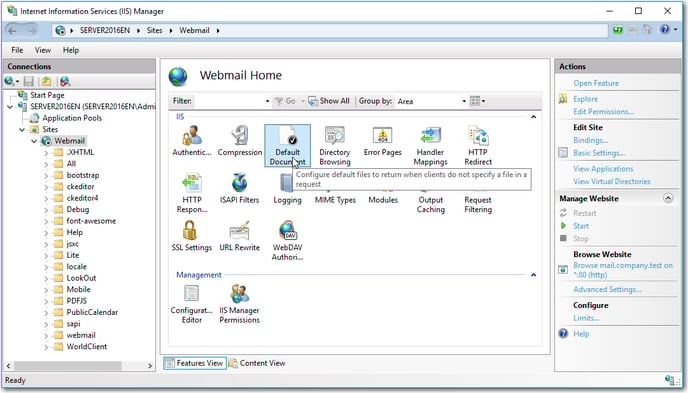
- Verify the default document is worldclient.dll.
- Remove any existing Default Documents other than worldclient.dll.
- Click Add and enter 'worldclient.dll' if the entry does exist
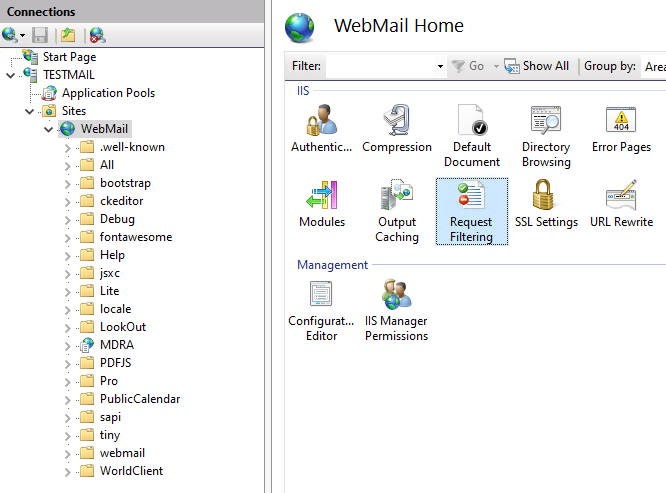
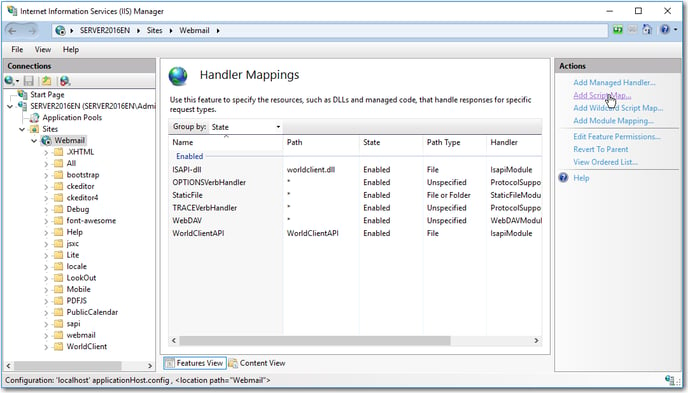
- Edit website feature permissions
- Click on the Webmail site in the Connections pane
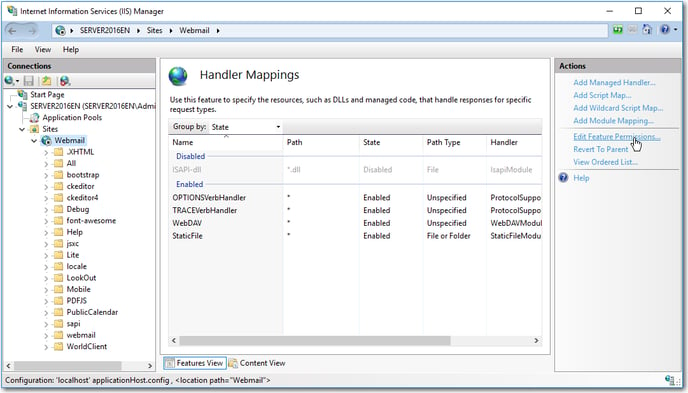
- Double click on Handler Mappings
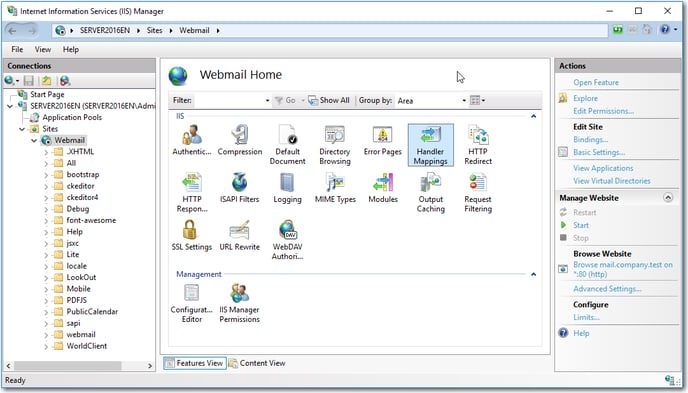
- Click Edit Feature Permissions on the Actions pane.
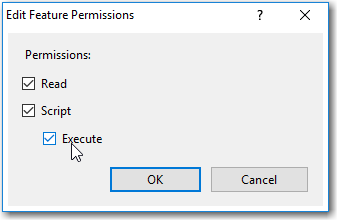
- Verify the boxes for Read and Script are selected (checked), and select (check) the box for Execute
- Click OK
Add CJS file name extension to MIME Types
MDaemon versions 22.0 and above will need to add another MIME type to the list.
- Select the Webmail site.
- Double click MIME Types
- Click Add... on the Actions menu.
- Enter .cjs in the File name extension textbox.
- Enter text/javascript in the MIME type textbox.

- Click Ok
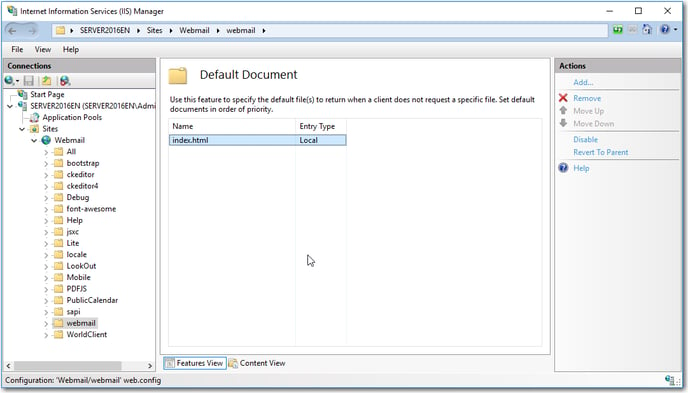
Edit the Default Document of the Webmail folder
MDaemon versions 19.5 and above will need to perform additional steps to utilize the Pro theme in IIS.
- Select the Webmail folder (not to be confused with the Webmail site name in this example)
- Double click Default Document
- Select the WorldClient.dll default document
- Click Remove

- Click Add
- Enter index.html
- Click OK
Increase the Maximum Query String to 3072 bytes
- Select the Webmail site
- Double click on Request Filtering.
- On the Actions menu on the right, select Edit Feature Settings...
- Set Maximum Query String (Bytes) to 3072.
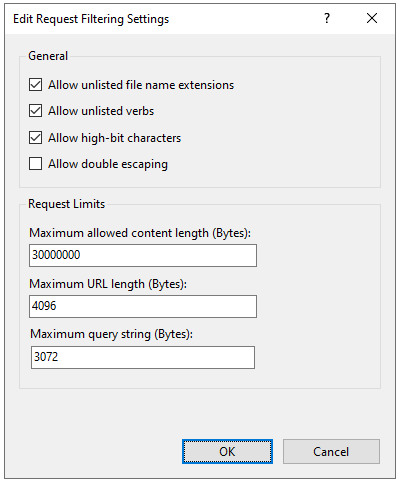
- Click OK
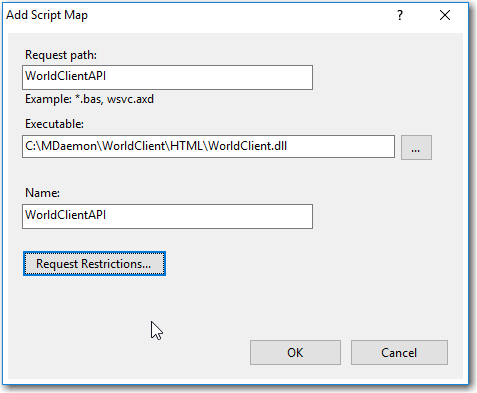
Add Webmail API Handler Mapping to IIS
- Select the Webmail website
- Double click on Handler Mappings
- Select Add Script Map...
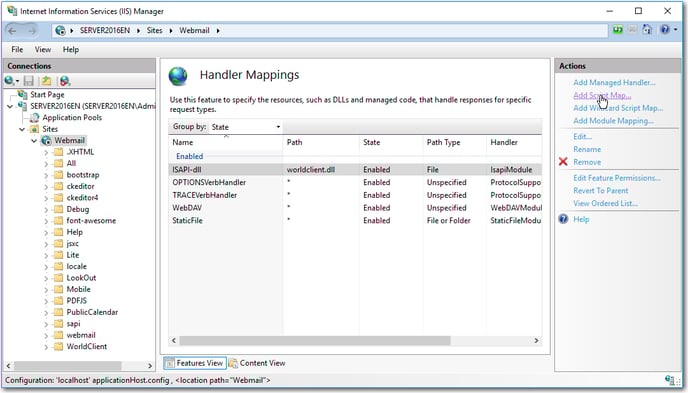
- Enter WorldClientAPI in the Request Path
- The Executable Path is the worldclient.dll in the \MDaemon\WorldClient\HTML directory
- Enter WorldClientAPI for the name
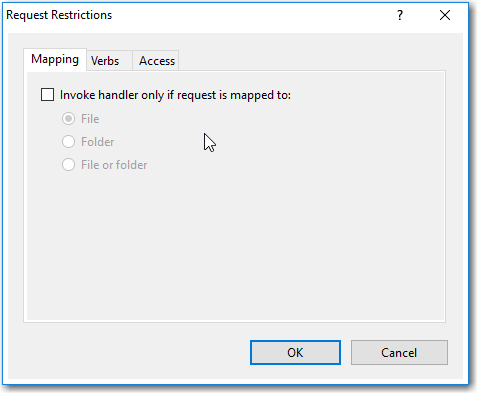
- Click Request Restrictions
- Remove the check mark in the Invoke handler only if request is mapped to:

- Select the Verbs tab and verify All verbs is selected
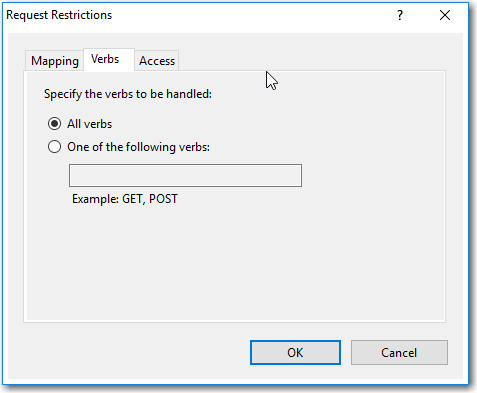
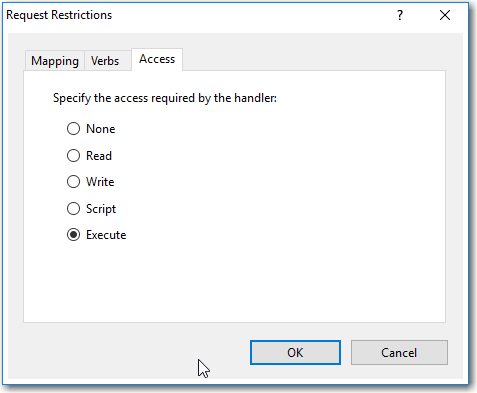
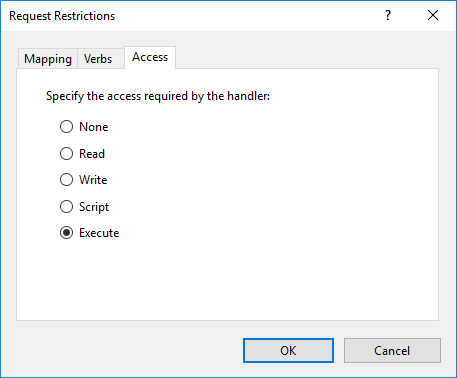
- Select the Access tab and select Execute

- Click OK
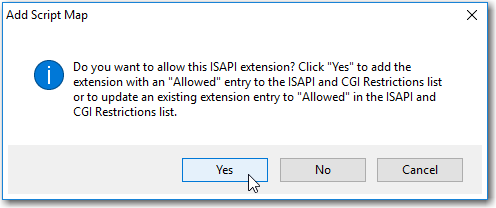
- Click Yes
Add XML API Handler Mapping to IIS
- Select the Webmail website
- Double click on Handler Mappings
- Select Add Script Map...

- Enter MDMgmtws in the Request Path
- The Executable Path is the MDMgmtws.dll in the \MDaemon\ISAPI\MDMgmtWS directory
- Enter XMLAPI for the name
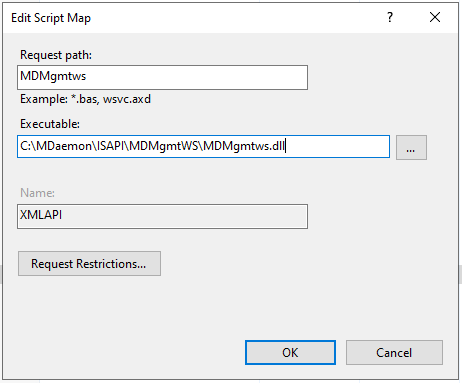
- Click Request Restrictions
- Remove the check mark in the Invoke handler only if request is mapped to:
- Select the Verbs tab and verify All verbs is selected

- Select the Access tab and select Execute
- Click OK
- Click Yes

Create the URL Rewrite Rule for Webmail Pro theme
- Select the Webmail folder (not to be confused with the Webmail site name in this example)
- Double Click URL Rewrite
- Select Add Rules from the Actions menu
- Select Blank rule
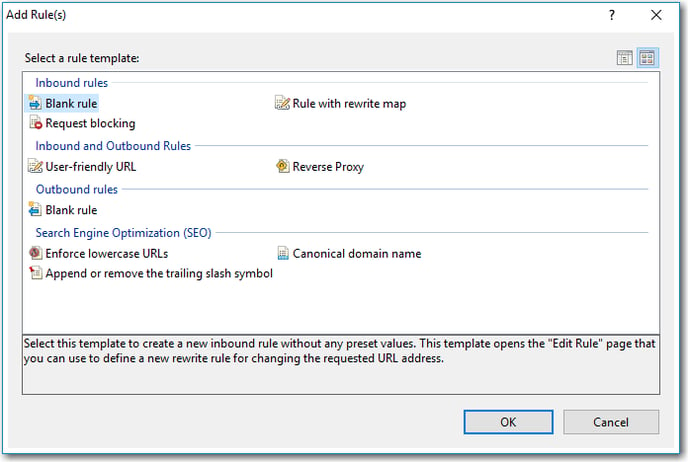
- Click OK
- Enter a name for the Inbound Rule
- Select Matches the Pattern in the Requested URL
- Select Regular Expressions in the Using drop down
- Enter .* in the Pattern text box
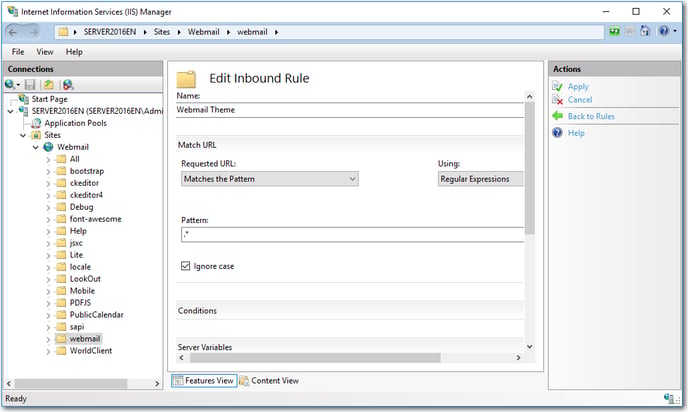
- Expand the Conditions section
- Click Add in the Condition section
- Select Is Not a Directory in the Check if input string section
- This changes the Condition to {REQUEST_FILENAME}
- Click OK
- Click Add in the Condition section
- Select Is Not a File in the Check if input string section
- This changes the Condition to {REQUEST_FILENAME}
- Click OK
- Select Rewrite for the Action Type
- Enter index.html in the Action Properties
- Check Append query string
- Check Log rewritten URL
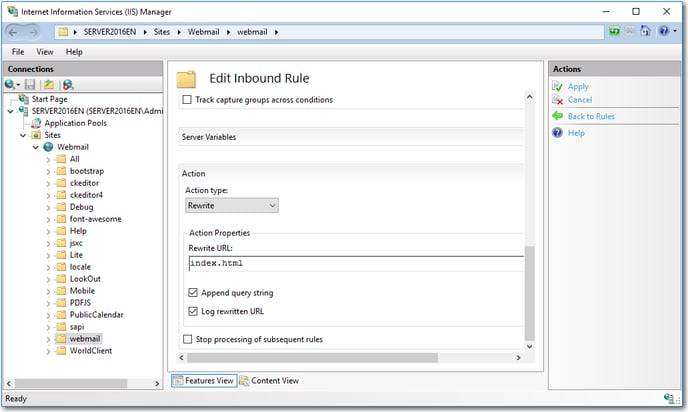
- Click Apply to apply the Inbound rule
Add the ActiveSync Handler Mapping to IIS
- Select the Webmail site from the Connections panel.
- Double click Handler Mappings
- Click on 'Add Script Map...'
- In the Request Path field, enter 'MDAirSync.dll'
- Under Executable, click the browse button (the button with '...')
- Browse to 'MDaemon\WorldClient\HTML\MDAirSync.dll' (on the C:\ drive by default)
- In the Name field, enter 'MDAirSync.dll'
- Click the Request Restrictions button
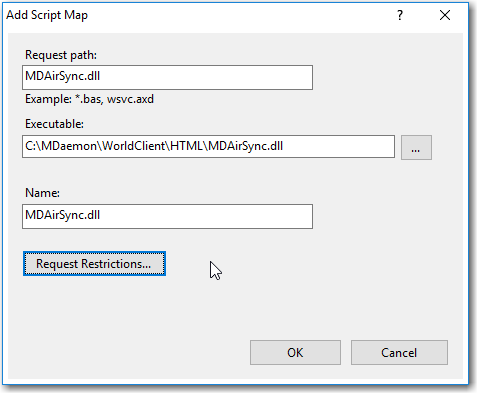
- Under the Access tab, select Execute
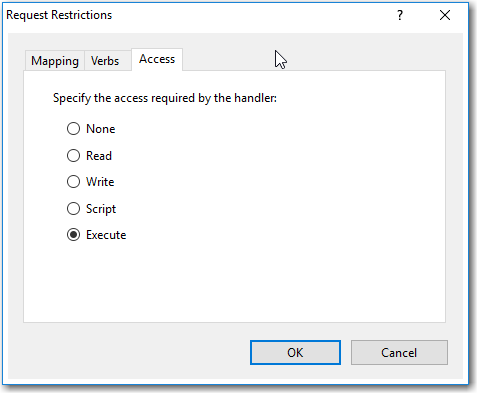
- Click OK
- Click OK
- Click Yes on the dialog that asks 'Do you want to allow this ISAPI extension...'
Add the AutoDiscover Handler Mapping to IIS
- Select the Webmail site from the Connections panel.
- Double click Handler Mappings
- Click on 'Add Script Map...'
- In the Request Path field, enter '/autodiscover/autodiscover.xml'
- Under Executable, click the browse button (the button with '...')
- Browse to 'MDaemon\WorldClient\HTML\MDAutoDiscover.dll' (on the C:\ drive by default)
- In the Name field, enter 'MDAutoDiscover'
- Click the Request Restrictions button
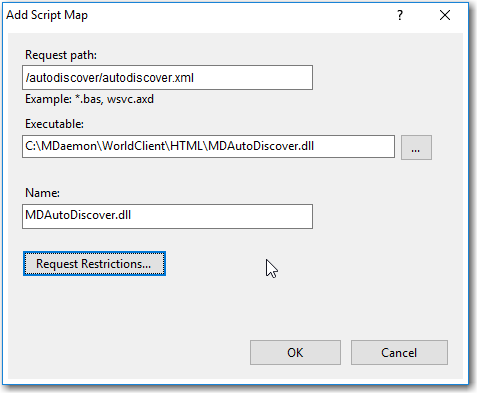
- Under the Access tab, select Execute

- Click OK
- Click OK
- Click Yes on the dialog that asks 'Do you want to allow this ISAPI extension...'
Add the MDDP Handler Mapping to IIS
- On the Handler Mappings Actions menu on the right, click on 'Add Script Map...'
- In the Request Path field, enter MDDP.
- Under Executable, click the browse button (the button with '...')
- Browse to '\MDaemon\ISAPI\MDDP.dll' (on the C:\ drive by default)
- In the Name field, enter 'MDDP'
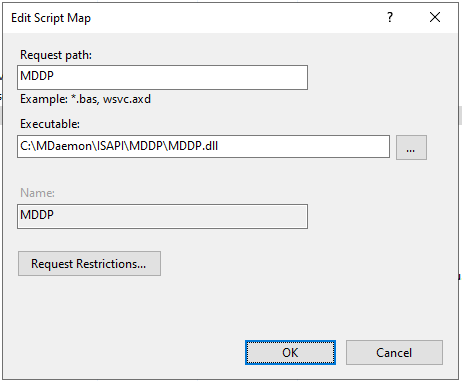
- Click the Request Restrictions button
- Under the Access tab, select Execute
- Click OK
- Click OK
- Click Yes on the dialog that asks 'Do you want to allow this ISAPI extension...'
Add the CalDAV Handler Mapping to IIS
If IIS had been configured prior to MDaemon 22, please remove the URL Rewrite rule for CalDav and run through the steps below.
- Select the Webmail site from the Connections panel.
- Double click Handler Mappings
- Click Add Script Map...
- Enter /.well-known/caldav in the Request Path textbox.
- Enter C:\MDaemon\WebDAV\MDWebDAV.dll in the Executable textbox.
(Modify the directory path if MDaemon was not installed on the C:\ directory) - Enter a name in the Name field; i.e MDCalDav.
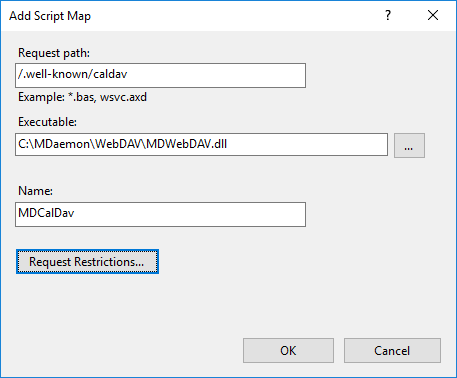
- Click Request Restrictions
- Select the Verbs Tab and verify All Verbs is selected.
- Select the Access Tab and choose Execute

- Click OK
- Click OK
- Click Yes to allow the ISAPI extension.
Add the CardDav Handler Mapping to IIS
If IIS had been configured prior to MDaemon 22, please remove the URL Rewrite rule for CardDav and run through the steps below.
- Select the Webmail site from the Connections panel.
- Double click Handler Mappings
- Click Add Script Map...
- Enter /.well-known/carddav in the Request Path textbox.
- Enter C:\MDaemon\WebDAV\MDWebDAV.dll in the Executable textbox.
(Modify the directory path if MDaemon was not installed on the C:\ directory) - Enter a name in the Name field; i.e MDCardDav.

- Click Request Restrictions
- Select the Verbs Tab and verify All Verbs is selected.
- Select the Access Tab and choose Execute
- Click OK
- Click OK
- Click Yes to allow the ISAPI extension.
Add the MDWebvDAV Handler Mapping to IIS
- Select the Webmail site from the Connections panel.
- Double click Handler Mappings
- Click Add Script Map...
- Enter webdav in the Request Path textbox.
- Enter C:\MDaemon\WebDAV\MDWebDAV.dll in the Executable textbox.
(Modify the directory path if MDaemon was not installed on the C:\ directory) - Enter a name in the Name field; i.e MDWebDav.
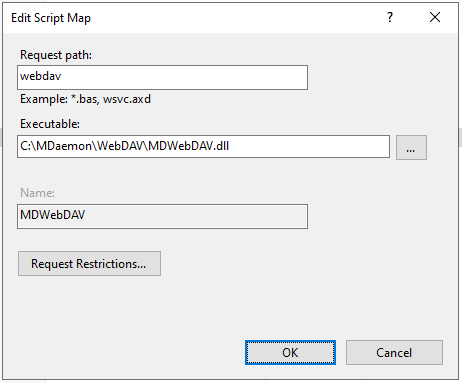
- Click Request Restrictions
- Select the Verbs Tab and verify All Verbs is selected.
- Select the Access Tab and choose Execute
- Click OK
- Click OK
- Click Yes to allow the ISAPI extension.
Create an MDaemon Remote Administration (MDRA) Application Pool.
- Right click on Application Pools.
- Click Add Application Pool
- Enter MDRA in the Name text box.
- Select Classic in the Managed pipeline mode drop down.

- Click OK
Add Remote Administration as an application in IIS.
- Right click on the Webmail application name.
- Select Add Application...
- Enter MDRA in the Alias text box.
- Click Select next to Application Pool and choose MDRA.
- Enter C:\MDaemon\WebAdmin\Templates in the Physical Path text box.
(Modify the directory path if MDaemon was not installed on the C:\ directory)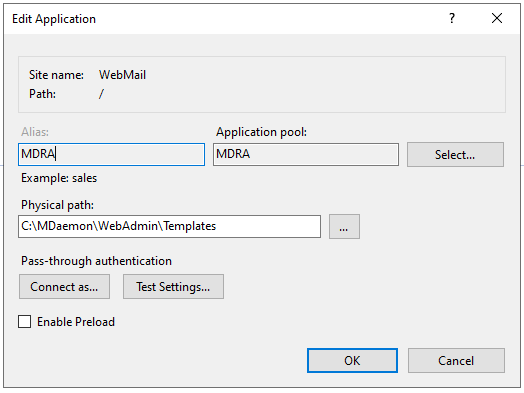
- Click OK
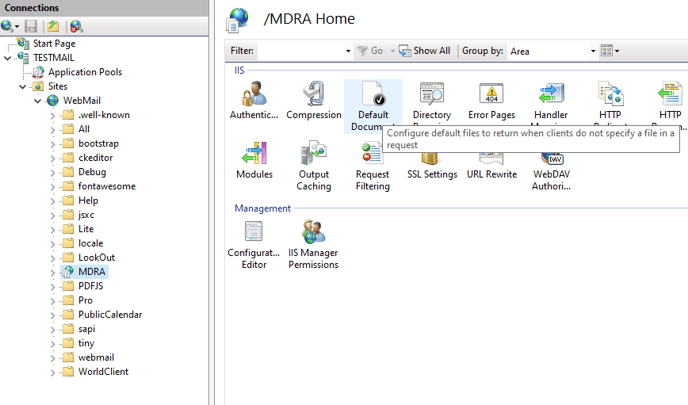
Verify/Edit the Default Document for Remote Administration
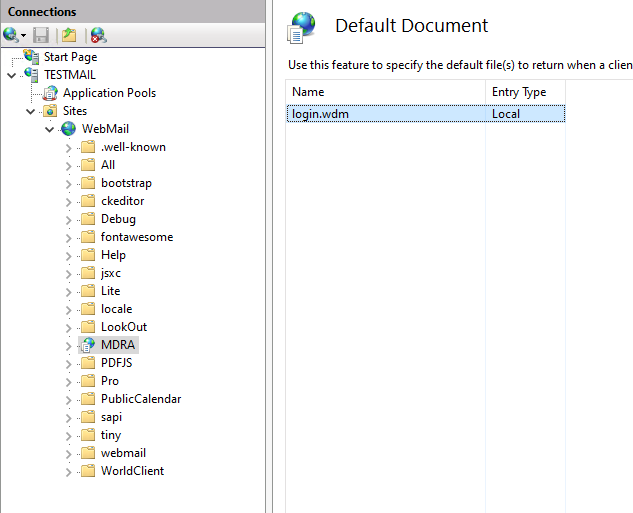
- Click on the MDRA application in the Connections pane.
- Double click on Default Document.
- Remove any existing Default Documents other than login.wdm.
- Click Add
- Enter login.wdm
- Click Ok
Add Remote Administration Handler Mapping to IIS
- Select the Webmail site from the Connections panel.
- Double click Handler Mappings
- Click Add Script Map...
- Enter *.wdm in the Request Path textbox.
- Enter C:\MDaemon\WebAdmin\Templates\WebAdmin.dll in the Executable textbox.
(Modify the directory path if MDaemon was not installed on the C:\ directory) - Enter MDRA in the Name field.
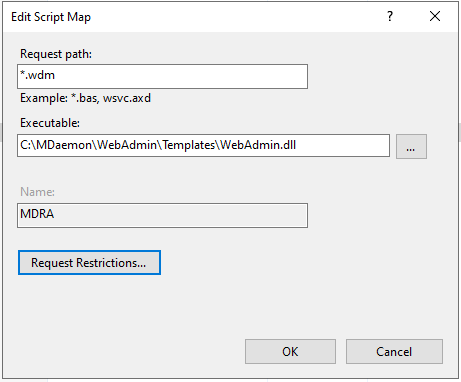
- Click Request Restrictions
- Select the Verbs Tab and verify All Verbs is selected.
- Select the Access Tab and choose Execute
- Click OK
- Click OK
- Click Yes to allow the ISAPI extension.
The next 7 steps apply to Windows 2008 R2 only! Otherwise, do not edit the Enable 32-bit Applications section of the advanced settings and continue with the article.
Configure the Webmail Application Pool for 64-bit
- Double-click on Application Pools on the Connections pane
- Select the Webmail application pool
- On the Actions pane, click Advanced Settings...
- In the General section, locate 'Enable 32-bit Applications'
- Select the field and choose False
- In the Process Model section, set Identity to Network Service
- Click OK
Enable and configure HTTP Strict Transport Security (HSTS) in IIS 10.0 and above
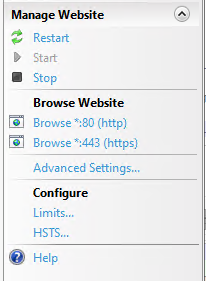
- Select the Webmail Site
- Click HSTS on the right panel under Configure (IIS 10.0 and above)
- Click Enable
- Enter 2592000 for the Max-Age value (30 days).
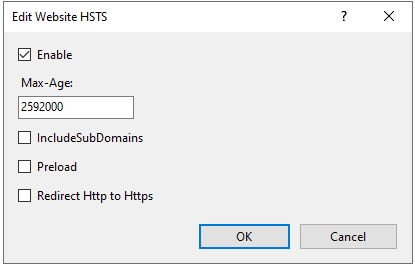
- Click OK
If an older version of IIS is running, HSTS can be configured manually by creating the HTTP Response Header in the section below.
- Name - Strict-Transport-Security
Value - max-age=2592000
Create Additional HTTP Response Headers
- Select the Webmail Site
- Double click HTTP Response Headers

- Click Add
- Name - Content-Security-Policy
Value - img-src * data: blob:;base-uri 'self';worker-src 'self' blob:;manifest-src 'self';frame-src 'self' data: - Click OK
- Repeat the same steps to add the following response headers:
- Name - Referrer-Policy
Value - same-origin - Name - X-Frame-Options
Value - sameorigin - Name - X-XSS-Protection
Value - 1
- Name - Referrer-Policy

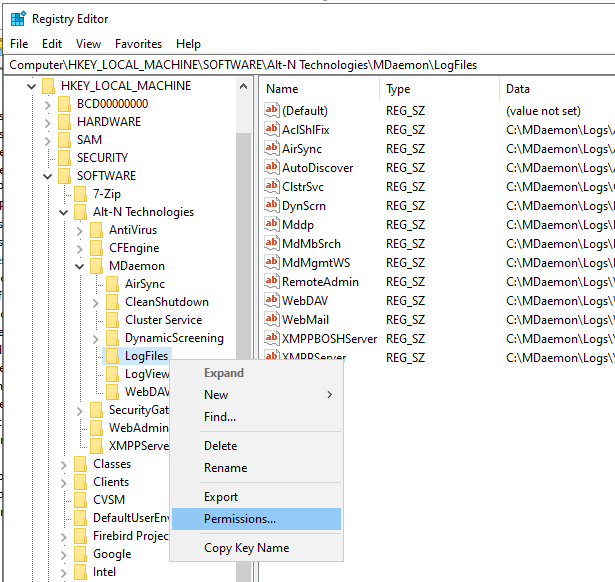
Grant the 'Network Service' account Full Control of the MDaemon LogFiles registry entry
- Open the Windows Registry (regedit).
- Navigate to HKLM:\SOFTWARE\Alt-N Technologies\MDaemon\LogFiles
- Right click on LogFiles
- Select Permissions
- Click Add
- Enter Network Service for the object name.
- Click Check Name to verify the NETWORK SERVICE name is selected.
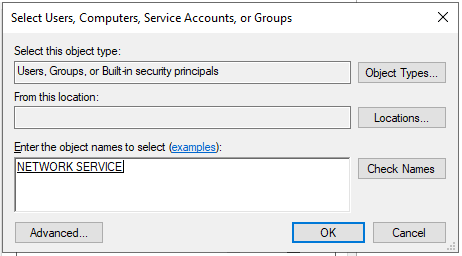
- Click OK
- Select Network Service
- Click Full Control
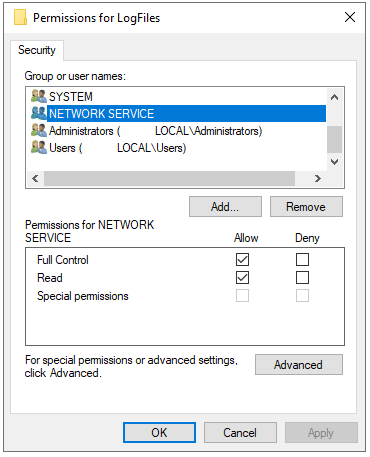
- Click OK
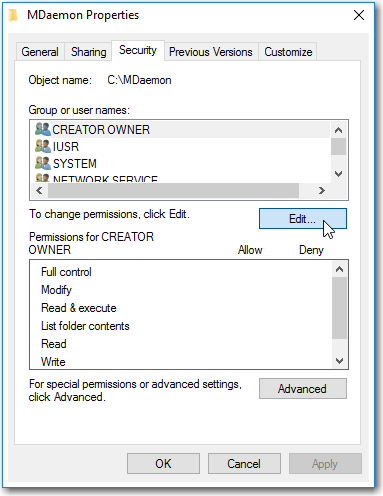
Update the NTFS permissions of the MDaemon directory
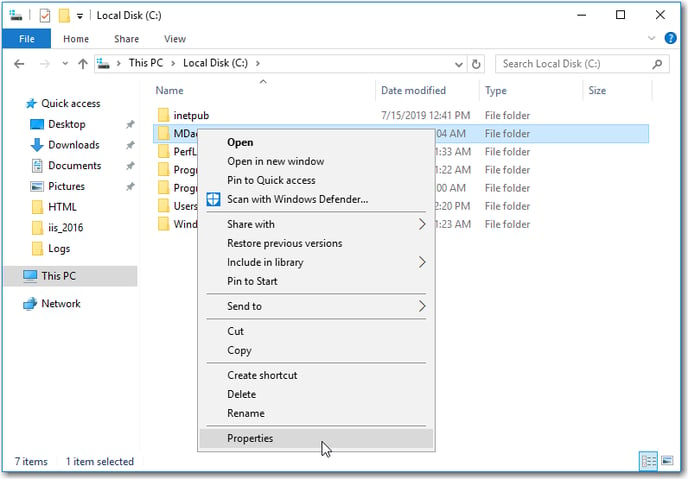
- Open Windows Explorer
- Navigate to the MDaemon directory (by default, 'C:\MDaemon')
- Right click on the MDaemon directory
- Choose Properties
- Choose the Security tab
- Click Edit
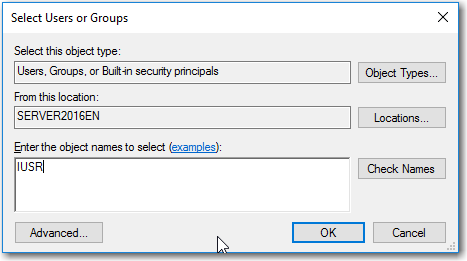
- Click Add
- Type 'IUSR'
- Click OK to close the Select Users or Groups dialog
- Enable Full control under Allow for IUSR

- Click Add...
- Type 'Network Service'
- Click OK to close the Select Users or Groups dialog
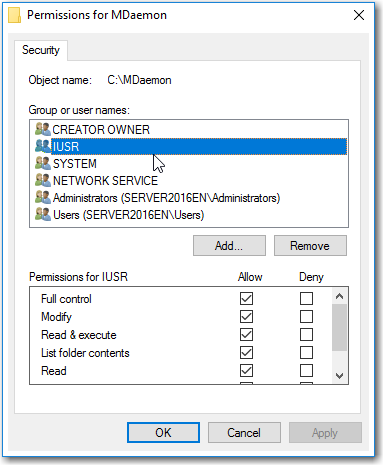
- Enable Full Control under Allow for Network Service
- Click OK to close the Permissions for MDaemon dialog and wait for the changes to take effect
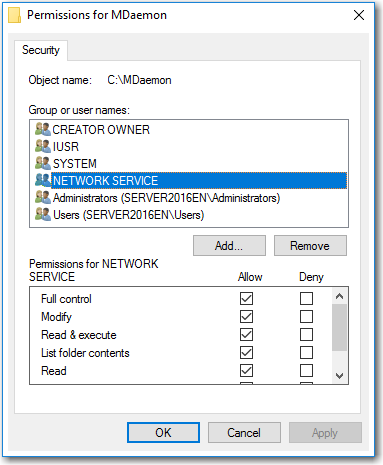
- Click OK to close the MDaemon Properties dialog
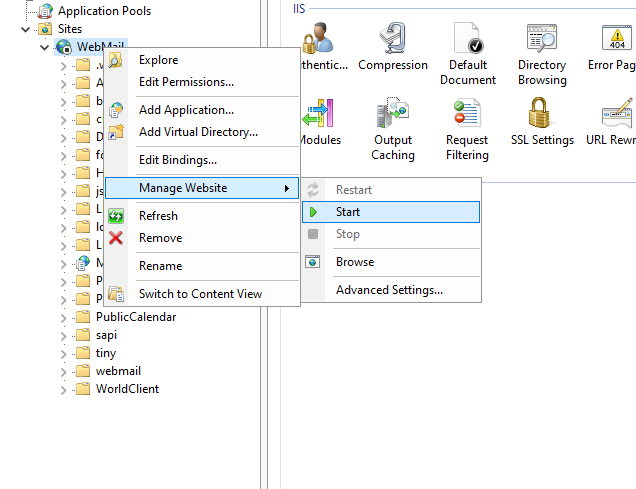
Start the Webmail site configured in IIS
- Open the IIS Manager
- Right click on the Webmail site.
- Mouse over Manage Website.
- Select Start
Switch from MDaemon's built-in Webmail webserver to IIS
- Open the MDaemon configuration session.
- Select Setup
- Select Web & IM Services...
- Select Web Server
- Select Webmail runs using external webserver (IIS, Apache, etc)
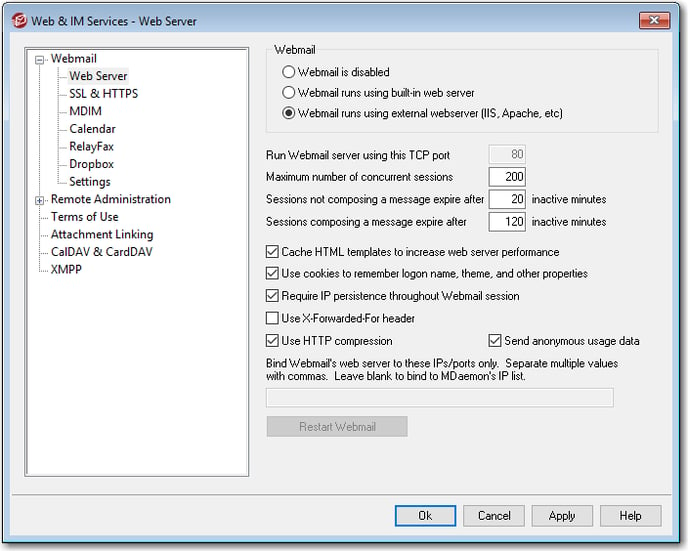
- Click OK
Switch from MDaemon's built-in Remote Administration webserver to IIS
- Open the MDaemon configuration session.
- Select Web & IM Services
- Expand Remote Administration
- Select Web Server
- Select Remote Administration runs using external webserver (IIS, Apache, etc)
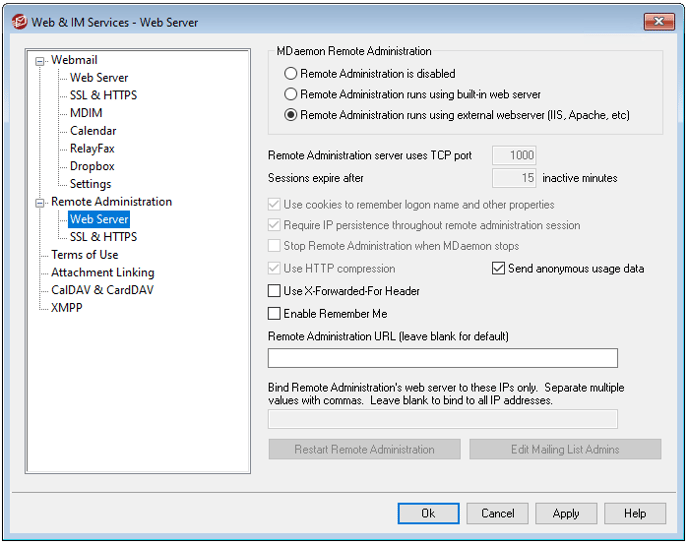
- Click Ok
To revert the Webmail and Remote Administration configurations back to the default web servers:
- Open the IIS Manager, right click on the Webmail site, select Manage Website, and select Stop.
- Select Application Pools, right click on the Webmail application pool, and select Stop. Do the same for the MDRA application pools.
- Open the Windows Services menu (services.msc) and stop the World Wide Web Publishing Service (W3SVC). If the World Wide Web Publishing Service is set to Automatic in the Windows Services menu, this service will restart when the server is rebooted. The service can be set to Manual from Automatic to prevent the service from starting on reboot.
- Follow the prior two steps above to switch the Webmail and Remote Administration configuration from the external server (IIS) to the built-in web server.
To completely remove the IIS website and configuration:
- Open the IIS manager, right click on Webmail site, select Remove to delete the site.
- In the IIS manager, select Application Pools and remove the Webmail and MDRA application pools.
- To remove IIS, open the Windows Server Manager, click the Manage button, select Remove Roles and Features, and follow the wizard to remove IIS.
- Remove any web.config files from the \MDaemon\WorldClient\ and \MDaemon\WebAdmin\ directories and sub-folders.
- Restart the server, verify World Wide Web Publishing Service is not running and follow the prior two sections above to switch the Webmail and Remote Administration configuration from the external server (IIS) to the built-in web server.