Secure messages are sent to a web portal. When the message is sent, the recipient receives an email notification that a secure message for them is available, with a link to create a Secure Message Recipient account so that they can view the message located on the SecurityGateway server. The secure message is accessed via the recipient's browser, and end-to-end encryption is maintained between the SecurityGateway server and the recipient via HTTPS encryption.
Secure messaging requires a valid SSL certificate and that HTTPS is enabled. Recipients can view and reply to the messages within the SecurityGateway portal, and they can optionally compose new secure messages to a designated list of users.
Secure Messaging Setup
- Login to the SecurityGateway web interface as the Global Administrator
- Select Setup/Users
- Select Secure Messaging
- Select Configuration
- Secure messaging can be configured globally or per-domain. Select the drop down next to For Domain: to select a specific domain or use the -- Global -- option to configure globally.
- Select Enable secure messaging
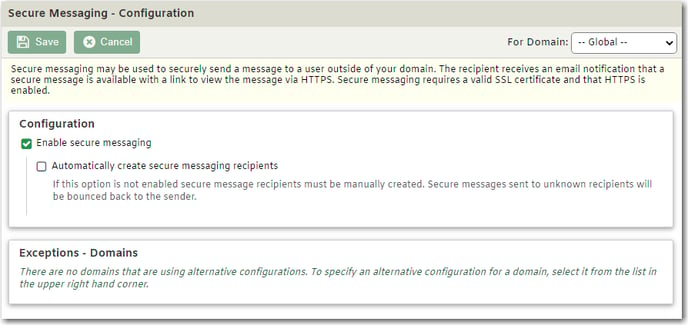
- (Optional) Select Automatically create secure messaging recipients
- By default whenever a secure message is sent to someone, a Secure Message Recipient account is created for the recipient and a link is provided for them to access the account and view the message in a secure message notification send by SecurityGateway. Recipient accounts must be created manually if this option is disabled.
- Select Recipients
- This page contains an entry for each Secure Message Recipient account that has been automatically or manually created. If you wish to create a new recipient account manually, click New on the toolbar. You can quickly enable or disable an account by checking or unchecking its corresponding checkbox in the Enabled column.
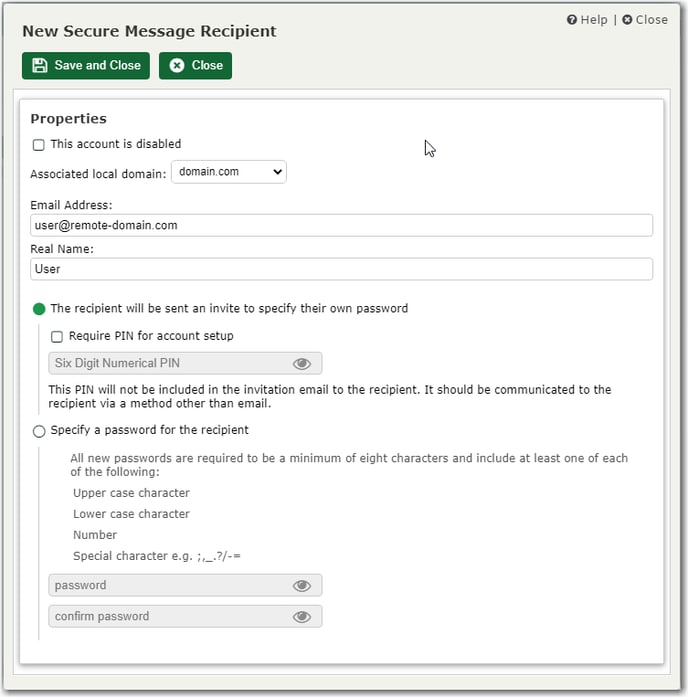
- Click New to create a new secure message recipient.
- Enter the email address.
- Enter the name.
- Choose either to allow the recipient to create a password/PIN or create one for the recipient.
- Click Recipient Options
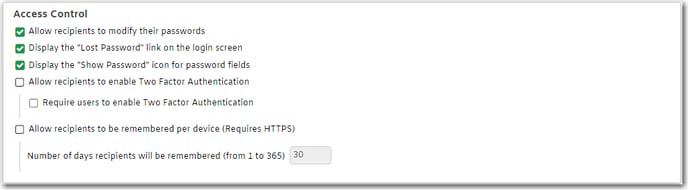
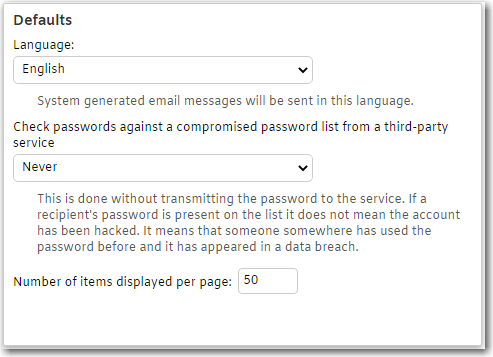
- Use this page to configure various options and default settings that will apply to secure message recipient accounts, and to designate which options they will be able to configure for themselves in the web portal.
- Access Control Options
- Defaults
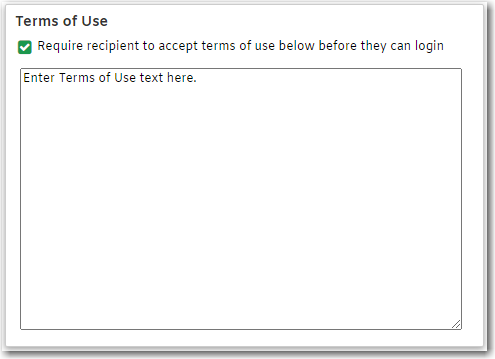
- Terms of use options.
- New Recipients options.

- Click Message Composition
- This is a domain-specific setting that you can use to allow secure message recipient accounts that are associated with the selected domain to compose new messages to local users from a predetermined list. The recipient will compose the messages from within the secure message portal and will select the To addresses from a drop-down list.
- Note: Recipient accounts are always allowed to reply to any secure messages they receive.
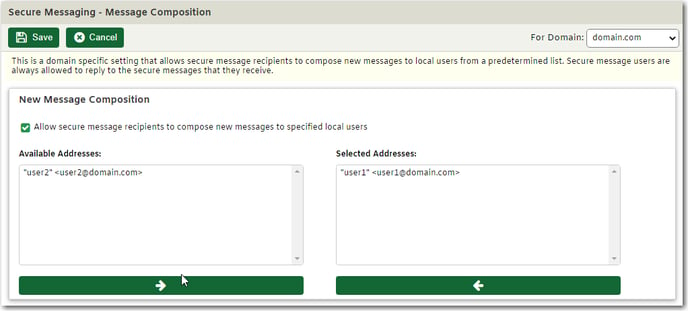
- (Optional) Select Allow secure message recipients to compose new messages to specified local users
- Select a domain in the For Domain: list and check this box if you wish to allow recipient accounts associated with that domain to compose new messages. The accounts will then be able to compose messages to any local addresses you have added to the Selected Addresses list below. Uncheck the box if you do not wish to allow the domain's recipient accounts to compose new messages. They will only be able to reply to secure messages they receive.
- Available Addresses
This box lists the selected domain's users. Select an address and click the right-facing arrow to move it to the Selected Addresses box. - Selected Addresses
These are the local addresses to which secure message recipient accounts associated with the selected domain can send new messages.
Sending a Secure Message
- Select Security
- Select Filtering
- Select Message Content
- Click New to bring up the Message Content Filter Rule menu.
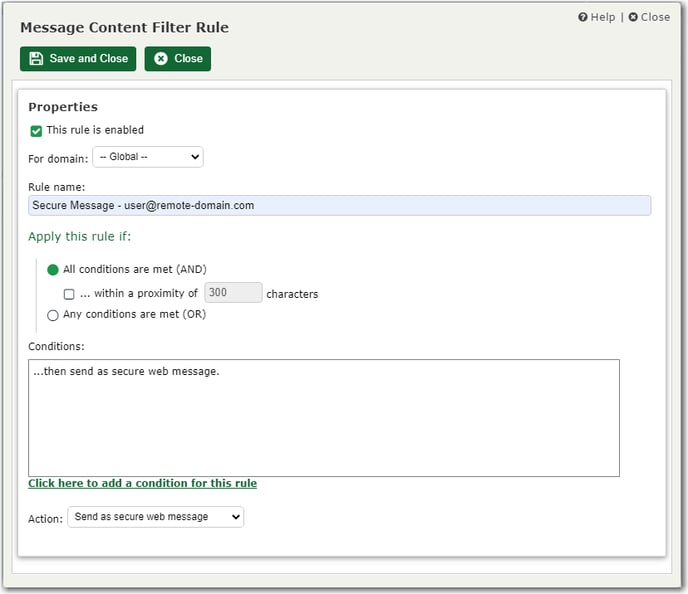
- Enable the rule.
- Choose the domain the rule should apply to or use the Global option.
- Choose the option to trigger the rule if any or all of the Conditions are met.
- Select Click here to add a condition for this rule to bring up another menu to create the rule conditions. In this screenshot, this condition is met if the recipient is user@remote-domain.com.
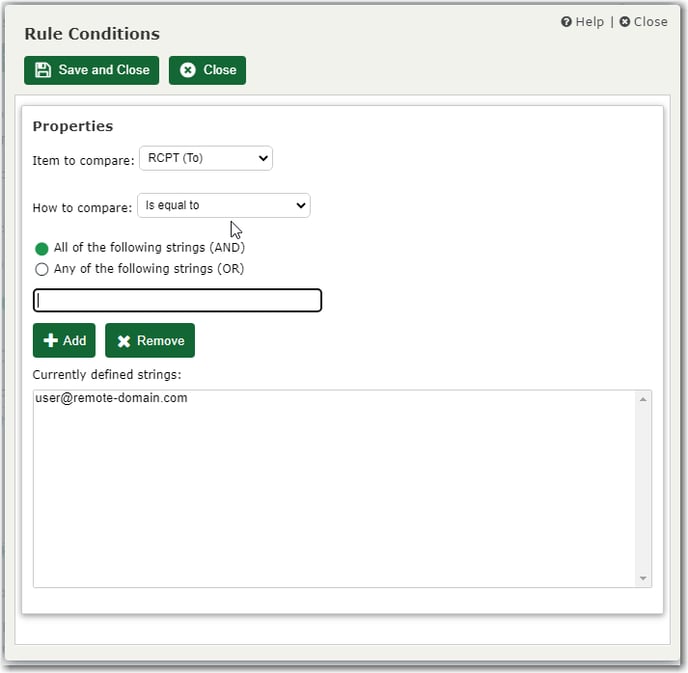
- Choose one of the following items to compare.
- MAIL (From)—This test uses the value passed in the SMTP "MAIL From" command. This is who the message is from, but it will not necessarily be the same information that is contained in the message's From header. Sometimes the From header will contain additional or different information. In addition to the nine common ways to test or compare items (see below), this item can also be compared using the "Is local user" and "Is not local user" tests.
- RCPT (To)—This test uses the value passed in the SMTP "RCPT To" command. This is who the message is to, but it will not necessarily be the same information that is contained in the message's To header. Sometimes the To header will contain additional or different information. In addition to the nine common ways to test or compare items (see below), this item can also be compared using the "Is local user" and "Is not local user" tests.
- MAIL and RCPT—Choose this item to use both the SMTP "MAIL From" and SMTP "RCPT To" commands to determine whether a message is or is not an inbound, outbound, or an internal message (see "Additional test methods" below).
- IP—Select this item to test against the IP address of the sending server or client.
- Header—Select this item if you wish to specify a header to compare. When selected, a Name of header option will appear for you to specify which header to use for this test condition. In addition to the nine common ways to test items, this item can also be compared using the "Header exists" and "Header does not exist" tests. NOTE: when specifying the Name of header, do not use a colon in the header name. For example, use "From" as the Name of header, not "From:" if you wish to compare against the From header.
- Subject—This is the message's Subject header. Select this item if you wish to test against the subject of the message.
- Body—Choose Body if you wish to use the message body as the test item to compare.
- Body or Subject—Choose this item if you wish create a rule that will be true if either the message Body or Subject matches the rule's criteria. This item is provided to simplify rule creation, because it is effectively the same as creating a rule with two separate "OR" statements, one to search the Body and the other to search the Subject for the same text.
- Choose a How to Compare option.
- Contains—When this method is selected, the comparison will match or be "True" if the Search value is a substring or part of the Item to compare designated above. For example, if you select MAIL (From) as the item to compare, then choose Contains as the method of comparison, with "example.com" as the Search value, then any message from an address containing "example.com" will match the condition.
- Does not contain—This comparison will match or be "True" if the Search value is NOT a substring or part of the Item to compare designated above. For example, if you select MAIL(From) as the item to compare, then choose Does not contain as the method of comparison, with "@example.com" as the Search value, then every message EXCEPT those from an address at "example.com" will match the condition.
- Contains the word—This comparator is similar to "contains" but will only match if there is a word boundary anchor proceeding and following the string. This avoids the need to manually create a regular expression in the format of: \b(word1|word2|word3)\b. For example, a rule searching for a message body that Contains the word "cat," would only match if the message contained the whole word "cat." It would not match simply because the body happened to contain the word catfish or certificate.
- Does not contain the word—This comparator is similar to "Does not contain" but will only match if there is no occurrence of the string with a word boundary anchor proceeding and following it. For example, a rule searching for a message body that Does not contain the word "cat" would match any message that did not contain the whole word "cat," even if it did contain the words catfish or certificate.
- Is equal to—This method is similar to Contains above, except that the Search value must match the value of the Item to compare exactly, rather than simply be a part of that value. For example, if you select IP as the item to compare, then choose Is equal to as the method of comparison, with "192.168.0.1" as the Search value, then ONLY messages coming from that exact IP address will match the condition.
- Is not equal to—This type of comparison is the opposite of the previous method. If the value of the Item to compare is NOT exactly the same as the Search value, then the comparison will be true. For example, if you select IP as the item to compare, then choose Is not equal to as the method of comparison, with "192.168.0.1" as the Search value, then every message EXCEPT those coming from that exact IP address will match the condition.
- Starts with—Use this type of comparison if you wish to consider a condition to be true when the Search value matches the beginning of the value of the Item to compare designated above. For example, if you select Subject as the item to compare and "[allstaff]" as the Search value, then all messages with a Subject line beginning with "[allstaff]" will match the condition.
- Does not start with—This is the opposite of the previous comparison type. Use this option if you wish to consider a condition to be true when the Search value DOES NOT match the beginning of the value of the Item to compare designated above. For example, if you select Subject as the item to compare and "[allstaff]" as the Search value, then all messages EXCEPT those with a Subject line beginning with "[allstaff]" will match the condition.
- Ends with—This comparison means the condition will match whenever the value of the Item to compare ends with the Search value. For example, if you select RCPT (To) as the item to compare and Ends with as the comparison method, with ".cn" as the Search value, then ALL messages to anyone with an address ending with ".cn" will match the condition.
- Does not end with—This comparison means the condition will match whenever the value of the Item to compare DOES NOT end with the Search value. For example, if you select RCPT (To) as the item to compare and Ends with as the comparison method, with ".cn" as the Search value, then all messages EXCEPT those to addresses ending with ".cn" will match the condition.
- Matches regular expression—Choose this option if you wish to use a Regular Expression when comparing the item selected in the Item to compare option above.
- Choose an option to match any or all of the applied strings.
- Use the Add/Remove buttons to add and/or remove stings to the rule.
- Click Save and Close when finished to return to the Message Content Filter Rule menu.
- Select Send as Secure Message as the action.