Bayesian Learning is a part of MDaemon's Spam Filter and is enabled by default. This allows users the ability view a public mail folder called "Bayesian Learning" (using clients that support mail folder syncing). This parent folder contains two child folders: Spam and Non-Spam. These are default folder names and can be customized. Users can then copy/move messages into these folders to be learned as spam or non-spam messages.
Webmail users have the added benefit of Spam and Not Spam buttons available when viewing mail.
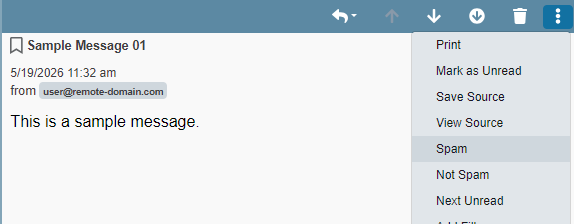
Example
When viewing a message in Webmail (this example is using the Pro theme), click on the three vertical dots to bring up the message options. Using a default configuration, the "Spam" and "Not Spam" options will be visible.
If the "Spam" and "Not Spam" buttons are not available when viewing mail in Webmail, then one or more of the topics below may be configured.
- Public Folders have been disabled.
-
The Bayesian Learning folder directories do not exist or point to an invalid location.
-
The permissions to these public folders have not been setup correctly or have been removed.
- User settings have been over-ridden to remove access to the Spam and Not Spam message options.
- The global or domain level user settings have been over-ridden to remove access to the Spam and Not Spam message options.
1. Verify that Public Folders are enabled.
- Login to Remote Administration as a global administrator.
- Select Setup > Public Folders > Public & Shared Folders
- Verify that "Enable Public Folders" is checked.
2. The Bayesian Learning folder directories do not exist or point to an invalid location.
- Login to Remote Administration as a global administrator.
- Select Spam Filter > Filter Settings > Bayesian Classification
- Verify the paths to known spam and known non-spam directories exist and point to a valid location.
- Click Save if any changes are made.
3. The permissions to these public folders have not been setup correctly or have been removed.
-
Login to Remote Administration as a global administrator.
- Select Setup > Public Folders > Public Folder Manager
- Click on the right facing arrow next to Bayesian Learning to view the child folders.
- Select Non-Spam
- Click Edit to bring up the Public Folder Editor
- Click Edit Access Control
- The Default Rights (anyone) Access Level should be li (Lookup and Insert).
- The postmaster alias will have Lookup, Read, Insert, and Delete permissions by default.
- Feel free to adjust the permissions here if there are other accounts that should have the ability to view/move/delete these messages.
- If the Access Level is empty, click on Default Rights (anyone).
- Click Edit
- Select the Lookup Folder and Insert permissions.
- Click Save and Close
- Select Close to close the Edit Access Control menu.
- Click Save to save any changes.
- Select the Spam child folder from the Public Folder Manager and repeat the above steps.
Note: The Read permission is not granted by default. Some mail clients may display an error regarding these folders, as these clients expect a Read permission that is not granted. These folders are public, and messages contained in them should not be viewable by other users.
Suggestion: It could be a good idea to configure permissions for certain accounts that will reliably move messages into the Bayesian Spam and Non-Spam folders or mark them as spam/non-spam in Webmail.
Additional configurations outside the scope of this article could be made to periodically or manually process mail in the Bayesian Learning folders. Please contact our support team for any questions or suggestions on this (or any other) topic.
4. User settings have been over-ridden to remove access to the Spam and Not Spam message options.
Check:
- Login to the Windows server where MDaemon is running.
- Open a MDaemon Configuration Session.
- Select the Accounts menu.
- Select Account Manager
- Find the account in question and double click on it to to open the Account Editor.
- Select Mail Folders & Groups to find the user's mailbox directory path.
- The Mail Folders & Groups menu can also be found in Remote Administration by editing the account in the Main > Account Manager section.
- Using Windows Explorer, navigate to the user account directory path.
-
Open the WC folder in this directory.
- Open the User.ini file in a text editor.
- Search for [User] to find the user settings.
- The message options will not be available if the either of the following have been set to 'Yes' under the [User] section.
- DisableHamButton=Yes
DisableSpamButton=Yes
- DisableHamButton=Yes
- Modify the settings to Yes or No as desired.
- Save the User.ini file if any changes are made.
Double check for spelling errors and that no extra spaces have been added.
5. The global or domain level user settings have been over-ridden to remove access to the Spam and Not Spam message options.
The default setting for DisableHamButton and DisableHamButton is No. However, the default configuration can be changed and/or overridden at a global or domain level.
-
Login to the Windows server where MDaemon is running.
- Using Windows Explorer, navigate to the directory where MDaemon is installed.
- Open the WorldClient folder.
- Open the Domains.ini file in a text editor.
- Make a copy of the Domains.ini file before manually editing. This copy can be used to revert any changes made in the event of any issue that may arise.
- In the [Default:UserDefaults] section, you can find the default settings for all users.
- DisableHamButton=No
DisableSpamButton=No
- DisableHamButton=No
- In the [Default:UserOverrides] in the same Domains.ini file and inspect or adjust the entries here as desired.
- Settings configured here will over-ride any default global or user-configured setting.
- In the [<domain-name>:UserOverrides] in the Domains.ini file to view/edit the per-domain overrides (Replace <domain-name> with the actual domain you're looking for).
- Per-domain overrides effectively override the [Default:UserOverrides] settings.
- Save any changes to the Domains.ini file.
Note: To revert to the configuration after making any changes in the Domains.ini file, remove the existing Domains.ini file and paste in the copied Domains.ini file from earlier. A restart is not required. Though any changes require users to logout of their existing Webmail session and log back in.
Please feel free to contact our support team if you have any questions or need assistance.